Shasta Sms (talk | contribs) (new sections and boxes) Tag: Visual edit |
Shasta Sms (talk | contribs) (more boxes and images) Tag: Visual edit |
||
| Line 146: | Line 146: | ||
<pre> |
<pre> |
||
| − | Required: Machette, Radimus |
+ | Required: Glass orb, Lockpick, Machette, Pickaxe, Radimus Scrolls, Rope, Runes to cast Charge Orb |
| + | Suggested: Axe, food, Prayer Potion, Second Glass orb, additional Runes to cast Charge Orb |
||
| ⚫ | |||
</pre> |
</pre> |
||
===Lower Legends caverns=== |
===Lower Legends caverns=== |
||
You should now visit the [[bank]] in [[Shilo Village]] to withdraw a [[rope]] and some materials for a charged orb spell (glass orb included). If you don't want to backtrack later on, you can sacrifice some space and withdraw a second orb spell. |
You should now visit the [[bank]] in [[Shilo Village]] to withdraw a [[rope]] and some materials for a charged orb spell (glass orb included). If you don't want to backtrack later on, you can sacrifice some space and withdraw a second orb spell. |
||
| + | [[File:Screenshot from 2018-07-25 08.45.00.png|thumb|220x220px|Dark Metal Gate]] |
||
| − | |||
Go back into the jungle and to the [[Legends caverns|north-western cave]], re-enter the cave. Make your way passed the bats and through the [[Ancient Wall|SMELL gate]] once more (you don't need the runes this time). Continue to a [[Dark Metal Gate]]. Use a Charge Orb spell (any will work) on the gate to go through. You will find several barrels inside which you can smash for a random effect. They may explode, or spawn a random monster, or with luck, drop some useful supplies like half-pies, one-dose prayer and stat potions, and certificates for fish, logs, or ores. |
Go back into the jungle and to the [[Legends caverns|north-western cave]], re-enter the cave. Make your way passed the bats and through the [[Ancient Wall|SMELL gate]] once more (you don't need the runes this time). Continue to a [[Dark Metal Gate]]. Use a Charge Orb spell (any will work) on the gate to go through. You will find several barrels inside which you can smash for a random effect. They may explode, or spawn a random monster, or with luck, drop some useful supplies like half-pies, one-dose prayer and stat potions, and certificates for fish, logs, or ores. |
||
| + | [[File:Screenshot from 2018-07-25 09.19.35.png|thumb|220x220px|Rope down into darkness]] |
||
| − | |||
If you haven't already, drink the [[Gujuo Potion]] and [[examine]] the [[Wooden Beam]] in the middle. Use the [[rope]] on the platform, then click on the [[Rope down into darkness]] and go down (careful, failing will deal around 16 damage). Attempt to take the hat then talk to the [[Viyeldi]]. Now go down the [[agility]] obstacles (watch your health here, you can take up to 28 damage upon failing) and kill one of each of the spirits for all 3 [[gems]] (keep track of their names so you'll know who you killed). Use [[Paralyze Monster]] on the level 120, 125 and 130 monsters and toggle it for easy kills. |
If you haven't already, drink the [[Gujuo Potion]] and [[examine]] the [[Wooden Beam]] in the middle. Use the [[rope]] on the platform, then click on the [[Rope down into darkness]] and go down (careful, failing will deal around 16 damage). Attempt to take the hat then talk to the [[Viyeldi]]. Now go down the [[agility]] obstacles (watch your health here, you can take up to 28 damage upon failing) and kill one of each of the spirits for all 3 [[gems]] (keep track of their names so you'll know who you killed). Use [[Paralyze Monster]] on the level 120, 125 and 130 monsters and toggle it for easy kills. |
||
| + | [[File:Screenshot from 2018-07-25 10.17.37.png|thumb|220x220px|Ancient Lava Furnace]] |
||
| − | |||
Now take all 3 crystal pieces to the [[Ancient Lava Furnace]] in the north-east. Place them all in one at a time then you get [[A red crystal]]. Use the crystal on the [[Rock (scenery)|brown rocks]] between the level 125s and level 130s to make it [[a glowing red crystal]]. Use the Crystal on the [[Cavernous Opening]] to the south. You might attacked by [[Lesser Demon]]s, just keep running west. |
Now take all 3 crystal pieces to the [[Ancient Lava Furnace]] in the north-east. Place them all in one at a time then you get [[A red crystal]]. Use the crystal on the [[Rock (scenery)|brown rocks]] between the level 125s and level 130s to make it [[a glowing red crystal]]. Use the Crystal on the [[Cavernous Opening]] to the south. You might attacked by [[Lesser Demon]]s, just keep running west. |
||
Attempt to "Move Rocks" by the north-west of the creek. [[Echned Zekin]] the ghost will appear, select the following chat options: "Who's asking? Do I know you? What can I do about that? I'll do what I must to get the water. Ok, I'll do it." You'll now have a [[Dark Dagger]]. |
Attempt to "Move Rocks" by the north-west of the creek. [[Echned Zekin]] the ghost will appear, select the following chat options: "Who's asking? Do I know you? What can I do about that? I'll do what I must to get the water. Ok, I'll do it." You'll now have a [[Dark Dagger]]. |
||
| − | ''It should be noted that you can get a second [[File:Dark Dagger.png]] [[Dark Dagger]] to keep if you drop the first one and talk to the ghost again to get another |
+ | ''It should be noted that you can get a second [[File:Dark Dagger.png]] [[Dark Dagger]] to keep if you drop the first one and talk to the ghost again to get another.'' |
Backtrack all the way up the [[agility]] obstacles to the [[A blue wizards hat|blue wizards hat]]. |
Backtrack all the way up the [[agility]] obstacles to the [[A blue wizards hat|blue wizards hat]]. |
||
| + | <pre> |
||
| ⚫ | |||
| + | Required: Armour, Blessed Golden Bowl with Pure Water, Book of Binding, Machette, Radimus Scrolls, Weapon |
||
| − | |||
| + | Suggested: Axe, Holy Water Vial, Magic spells, Silverlight, Super combat set |
||
| + | </pre> |
||
| ⚫ | |||
''Now you have two options; option 1 covers the easier but more lengthy one. The shorter and potentially more dangerous option 2 is covered below it.'' |
''Now you have two options; option 1 covers the easier but more lengthy one. The shorter and potentially more dangerous option 2 is covered below it.'' |
||
| Line 188: | Line 191: | ||
*If this version of demon is too hard for you, you can return to Ungadulu after having given the dagger back to [[Echned Zekin]]. Talk to him through the flames by clicking "Investigate", announce you killed [[Viyeldi]], and ask what you can do about it. He'll give you the Holy Force spell for free, and you can use it just like in method 1. |
*If this version of demon is too hard for you, you can return to Ungadulu after having given the dagger back to [[Echned Zekin]]. Talk to him through the flames by clicking "Investigate", announce you killed [[Viyeldi]], and ask what you can do about it. He'll give you the Holy Force spell for free, and you can use it just like in method 1. |
||
*Once you have defeated the demon, you can move the rock and collect the pure water with your [[Golden bowl]]. If you don't have your bowl, moving the rock will allow you to get water from the spring on the surface again using the reeds. |
*Once you have defeated the demon, you can move the rock and collect the pure water with your [[Golden bowl]]. If you don't have your bowl, moving the rock will allow you to get water from the spring on the surface again using the reeds. |
||
| + | <pre> |
||
| − | |||
| + | Required: Blessed Golden Bowl with Pure Water, Germinated Yommi tree seeds, Machette, Radimus Scrolls, Rune axe |
||
| ⚫ | |||
| ⚫ | |||
| + | </pre> |
||
| + | ===Totem=== |
||
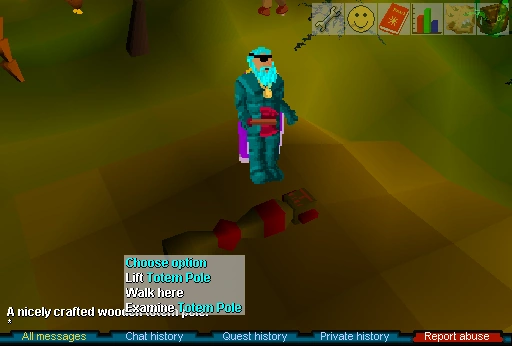
| + | [[File:Screenshot from 2018-07-26 09.31.11.png|thumb|220x220px|Totem pole]] |
||
Go back up to [[Ungadulu]] and tell him the good news. Make sure to ask "What do I do now ?". Now make sure you bank. Withdraw your [[rune axe]] and restore all of your [[prayer]] and [[hits]]. |
Go back up to [[Ungadulu]] and tell him the good news. Make sure to ask "What do I do now ?". Now make sure you bank. Withdraw your [[rune axe]] and restore all of your [[prayer]] and [[hits]]. |
||
| − | Find some [[fertile earth]] and use your [[Germinated Yommi tree seed]]s on it. It may fail so just go back to [[Ungadulu]] for more seeds or if you're not quick enough watering it, it may die. Now use your bowl of pure water on the [[Yommi Tree]] to make it grow big, then use your [[Rune |
+ | Find some [[fertile earth]] and use your [[Germinated Yommi tree seed]]s on it. It may fail so just go back to [[Ungadulu]] for more seeds or if you're not quick enough watering it, it may die. Now use your bowl of pure water on the [[Yommi Tree]] to make it grow big, then use your [[Rune axe]] on it to chop it down, once more to cut the branches of once it falls over, and a last time to make it into a totem pole. Now pick it up off the ground and you will lose around 7 [[strength]] levels. You can restore them with a potion or by waiting. |
| + | <pre> |
||
| + | Required: Armour, Bull Roarer, Machette, Radimus Scrolls, Totem Pole, Weapon |
||
| + | Suggested: Axe, Magic spells, Silverlight, Super combat set |
||
| + | </pre> |
||
| ⚫ | |||
Now find a [[Totem Pole (scenery)|Totem Pole]] in the south of the jungle. Prepare yourself by potting up. When you're ready, use the totem pole you have in your inventory on the totem pole standing on the ground. |
Now find a [[Totem Pole (scenery)|Totem Pole]] in the south of the jungle. Prepare yourself by potting up. When you're ready, use the totem pole you have in your inventory on the totem pole standing on the ground. |
||
If you gave the dagger to [[Ungadulu]], you will now get attacked by [[Nezikchened]] again. This time, he will NOT drain your [[prayer]], so just use [[Paralyze Monster]] the whole way through. |
If you gave the dagger to [[Ungadulu]], you will now get attacked by [[Nezikchened]] again. This time, he will NOT drain your [[prayer]], so just use [[Paralyze Monster]] the whole way through. |
||
| + | [[File:Screenshot from 2018-07-26 10.36.51.png|thumb|220x220px|Fighting [[Nezikchened]] for the last time]] |
||
| − | |||
If you killed [[Viyeldi]] with the dark dagger, you must fight the three spirits first before you can kill the demon. Fortunately, you only have to kill each one once, meaning if you need to run after killing one, they will not appear again. Do this if your prayer or health is running low to recharge before continuing your fight with the next combatant. When you fight [[Nezikchened]], he will drain your prayer to around 12 from full, but with proper gear and preparation, this should still be easier than the other two fights. |
If you killed [[Viyeldi]] with the dark dagger, you must fight the three spirits first before you can kill the demon. Fortunately, you only have to kill each one once, meaning if you need to run after killing one, they will not appear again. Do this if your prayer or health is running low to recharge before continuing your fight with the next combatant. When you fight [[Nezikchened]], he will drain your prayer to around 12 from full, but with proper gear and preparation, this should still be easier than the other two fights. |
||
After you kill the demon for the third and final time, use your [[Totem Pole]] on the other pole, and swing your [[bull roarer]] to say good bye to [[Gujuo]]. You'll get a [[Gilded Totem Pole]] from him. |
After you kill the demon for the third and final time, use your [[Totem Pole]] on the other pole, and swing your [[bull roarer]] to say good bye to [[Gujuo]]. You'll get a [[Gilded Totem Pole]] from him. |
||
| + | <pre> |
||
| − | [[File:LegendsQuestComplete.png|thumb|Completing the quest]] |
||
| + | Required: Gilded Totem Pole, Radimus Scrolls |
||
| − | |||
| + | Suggested: Teleport to Ardougne |
||
| − | |||
| + | </pre> |
||
==='''Finishing Up'''=== |
==='''Finishing Up'''=== |
||
| − | Now, return to the [[Legends Guild]]. Use the [[Gilded Totem Pole]] on [[Sir Radimus Erkle]]. Now enter the doors up north and talk to Sir Radimus Erkle to get experience in 4 skills of choice. Most players choose [[Herblaw]], as it will get you up a few levels from 45. You can now wield a [[Dragon Square Shield]] and wear a [[Legends Cape]] which can be purchased in the guild. |
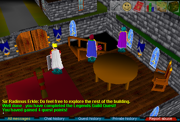
+ | [[File:LegendsQuestComplete.png|thumb|Completing the quest]]Now, return to the [[Legends Guild]]. Use the [[Gilded Totem Pole]] on [[Sir Radimus Erkle]]. Now enter the doors up north and talk to Sir Radimus Erkle to get experience in 4 skills of choice. Most players choose [[Herblaw]], as it will get you up a few levels from 45. You can now wield a [[Dragon Square Shield]] and wear a [[Legends Cape]] which can be purchased in the guild. |
Revision as of 20:20, 26 July 2018
Quest details
| Name: Legend's Quest |
| Release date: 20 August 2003 (Update) |
| Pay-to-play: Unknown edit |
| Start: Legends' Guild Wrought Mithril Gates, north-east of East Ardougne. |
| Difficulty: *****
|
| Length: Long |
Requirements:
|
Items needed:
|
Monsters to defeat:
Rewards
|
| Recommended: Unknown edit |
Walkthrough
Required: None
Suggested: Runes to teleport to Ardougne, 30gp (For boat to Brimhaven)
Getting Started
Accepting the quest
Talk with Legends Guild Guards at the Legends' Guild, located west of the Barbarian Outpost. Inside, speak with Sir Radimus Erkle. Ask him about how you can be a member of the Legend's Guild and you'll get the Radimus Scrolls in your inventory. Now inside the guild, search the cupboard in the north-western building towards the north of the room to get a Machette.
Required: Charcoal, 3 Papyrus, Machette, Radimus Scrolls
Suggested: Axe, 2 extra Papyrus, 2 extra Charcoal
Mapping the Jungle
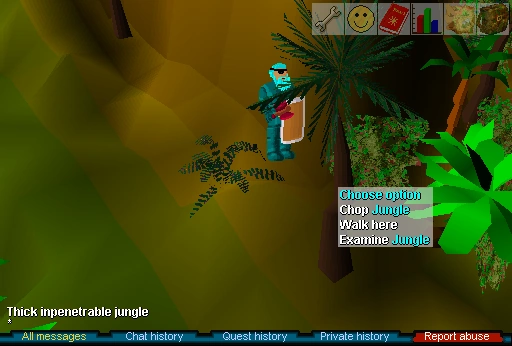
Getting through the Jungle
Head to the east entrance of Shilo Village but do not enter (only if you need to bank, or some of the quest items such as charcoal or papyrus can be purchased in the shop), then continue on down south. Here talk with Jungle Forester. Cut your way into the Kharazi Jungle with the machette. You can cut through the trees with any axe, but it's not necessary; you can find a path that only requires cutting through the regular jungle plants. Start mapping the jungle with the Radimus Scrolls. Map at the western section, middle section, and eastern section of the jungle (you do not have to go too far deep into the jungle for this part). Show the completed map to the forester, and you'll get a Bull Roarer.
Required: Bull Roarer, Machette, Radimus Scrolls
Suggested: Axe
Exploring the Shaman's Cave
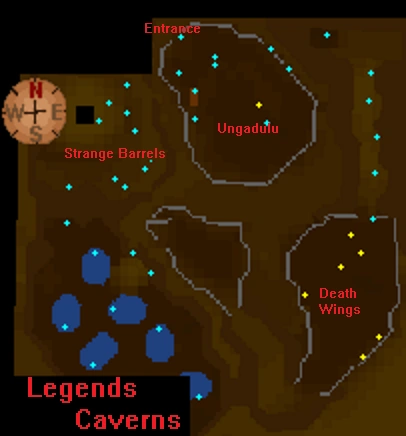
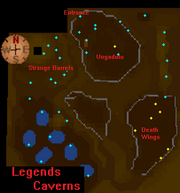
Map of the caverns.
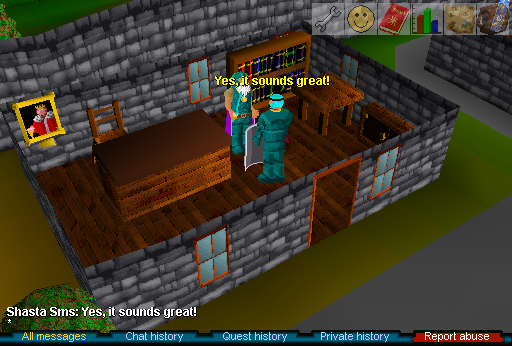
Swing your Roarer around the jungle (try the middle and around the little patches on your map) and Gujuo will appear. Go through every chat option you can with him. Now find 3 rocks in the north-northwestern part of the jungle, search them, and go down into the cave. Investigate the flamewall, and the man trapped inside will talk to you. Exit using the cave entrance and use your bull roarer to find Gujuo again and tell him you need to put out the flames with pure water. Make sure to inquire about obtaining the water and ask him all the options or you might not be able to obtain the pure water.
Required: 2 Gold bars, Hammer
Suggested: 2-4 spare Gold bars
Golden bowl 
Head back to Shilo Village and withdraw some gold bars and a hammer, then head to Tai Bwo Wannai so you can use the Gold Bars to make a Golden Bowl. Bring several gold bars, as it's possible to fail and you will lose gold bars if that happens. Deposit your hammer and withdraw your runes, gems, a pickaxe and lockpicks (you may need more inventory space so deposit what you don't need).
Required: Machette, Radimus Scrolls
Suggested: Axe, Prayer potion
Pure Water
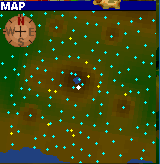
Location of the shallow water
Now get it blessed by Gujuo by going to a spot in the jungle and using your Bull Roarer to summon him. Note; you will need 42 prayer points to do this, and failing will deplete your prayer points, so bring a prayer potion just in case.
If Gujuo does not appear, you may need to speak with Ungadulu again.
Now find the shallow water in the jungle, and get your pure water from this. You'll have to use your Machette on the Tall Reeds right by the small pool in the jungle. Use the Cut reed plant on the Shallow water and now you should have a Blessed Golden Bowl with Pure Water.
Required: Blessed Golden Bowl with Pure Water, 1 Earth-Rune, 7 Gems, 2 Law-Runes, Lockpick, Machette, 1 Mind-Rune, Pickaxe, Radimus Scrolls, 1 Soul-Rune
Suggested: Axe
Book of Binding
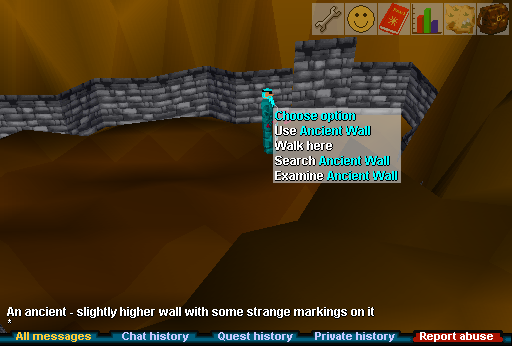

Ancient wall
Go back into the north-western cave, use your water on the firewall and talk to Ungaldulu. Investigate the firewall and select jump, then search the bookcase and go in. Go all the way through the different agility, strength and thieving obstacles (lockpick and pickaxe required) and level 80 Death Wings until you get to an Ancient Wall.

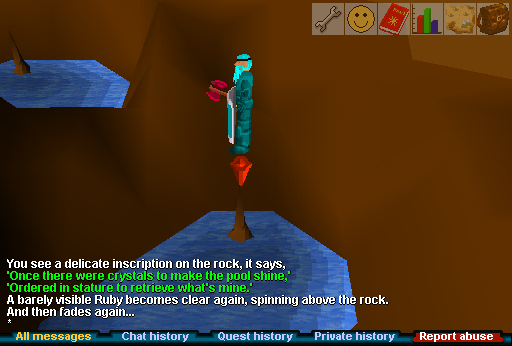
Using gems on the
Use 1 soul-rune, 1 mind-rune, 1 earth-rune, and 2 law-runes on the wall in that particular order. Continue on until you reach the section with many pools.
Now use all 7 gems on the Carved Rocks coming out of the water. There are two rows of pools spanning northwest to southeast. Beginning with the most northern pool in the row of four, place the first four gems in ascending order (opal, jade, red topaz, sapphire), moving southeast after each pool. Then begin with the northwestern pool and place the remaining three gems (emerald, ruby, diamond), again moving southeast after each pool. A pool will not accept an incorrect gem, so you can keep trying each pond until you get it right. Once all gems have been placed, you will receive the Booking of Binding.
Required: Armour, Blessed Golden Bowl with Pure Water, Book of Binding, Machette, Radimus Scrolls, Weapon
Suggested: Axe, Holy Water Vial, Magic spells, Silverlight, Super combat set
First battle
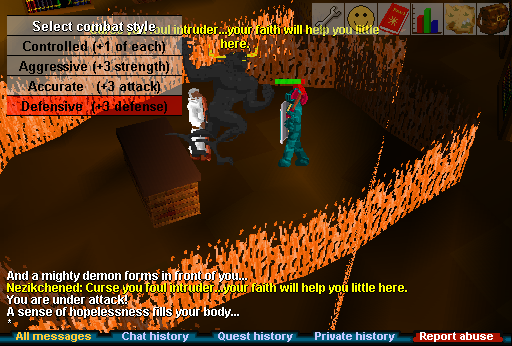
Fighting Nezikchened
Travel back out of the cave and get some more holy water into your bowl if needed, then throw the pure water from your golden bowl on the flamewall to pass through, then use the Book of Binding on Ungadulu and fight the level 172 demon Nezikchened. He will drain a majority of your prayer pretty quickly and it's a pretty difficult fight. If you run, you must do the battle from the start all over again.
Please note that your friends will not be able to help you with this fight; if they try to shoot bows or cast spells, it will say their attack passes through the demon, and the demon will vanish on its own mid-fight, forcing you to start over again. Bring some magic spells and if you want to be on the safe side.

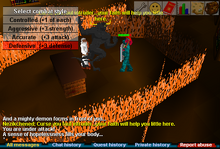
Using Holy Water Vial
If the fight is too hard, the book of binding will let you create holy water vials. Read the book's "Enchanto" spell with an empty vial in your inventory to enchant it with 10 prayer and 10 magic stat points, giving an enchanted vial. It must be filled with pure spring water from a blessed golden bowl - recall that in order to fill the golden bowl, the reeds must be cut to extract the water from the spring. Then, approach Ungadulu and click the vial's Throw option to soak him. This will weaken the demon when it appears. You can also stockpile these to use against other demons as powerful long range weapons, though the process to create them takes a while, so it's usually not worth it.
After you defeat the demon, talk with Ungadulu, and he'll give you 3 Yommi tree seeds and a Magical Fire Pass so you can go through the flames without having to use your special bowl with water anymore. You should still have some water left however, so use it on the Yommi tree seeds and it will create Germinated Yommi tree seeds.
Required: Bull Roarer, Machette, Radimus Scrolls
Suggested: Axe
Replenishing the Pure Water
Now head back to the Shallow water and cut a reed with your Machette. Try to use your reed on the Shallow water to only find the water has dried up. Swing your Bull Roarer and summon Gujuo. Ask him the second option and he will tell you a story, then ask for his help. You must also ask Gujuo about Snake Weed and Ardrigal in order to find them. It's just safe to talk to him about every option.
Required: Ardrigal (Obtained during), Snake Weed (Obtained during), Vial of water
Suggested: Axe, Cure poison Potion
Gujou Potion
You must now get a vial of water (can be purchased in the Tai Bwo Wannai General Store), some Snake Weed and Ardrigal. Snake Weed can be found when you search the red vines north-west of Shilo Village and south-west of Tai Bwo Wannai. After searching they appear on the floor, so pick the herb up and identify it to reveal Snake Weed. Now go to the ship yard east of Tai Bwo Wannai and search a searchable PalmTree, that is just east of the gate, then pick up the herb and identify it to reveal Ardrigal. Add both herbs to the same vial of water to create a Gujuo Potion. Drink it right away to save space; the effect is permanent.
Required: Glass orb, Lockpick, Machette, Pickaxe, Radimus Scrolls, Rope, Runes to cast Charge Orb
Suggested: Axe, food, Prayer Potion, Second Glass orb, additional Runes to cast Charge Orb
Lower Legends caverns
You should now visit the bank in Shilo Village to withdraw a rope and some materials for a charged orb spell (glass orb included). If you don't want to backtrack later on, you can sacrifice some space and withdraw a second orb spell.

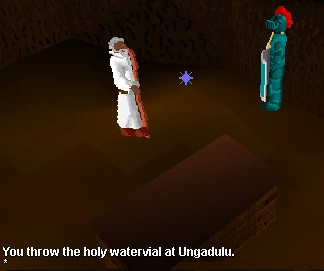
Dark Metal Gate
Go back into the jungle and to the north-western cave, re-enter the cave. Make your way passed the bats and through the SMELL gate once more (you don't need the runes this time). Continue to a Dark Metal Gate. Use a Charge Orb spell (any will work) on the gate to go through. You will find several barrels inside which you can smash for a random effect. They may explode, or spawn a random monster, or with luck, drop some useful supplies like half-pies, one-dose prayer and stat potions, and certificates for fish, logs, or ores.


Rope down into darkness
If you haven't already, drink the Gujuo Potion and examine the Wooden Beam in the middle. Use the rope on the platform, then click on the Rope down into darkness and go down (careful, failing will deal around 16 damage). Attempt to take the hat then talk to the Viyeldi. Now go down the agility obstacles (watch your health here, you can take up to 28 damage upon failing) and kill one of each of the spirits for all 3 gems (keep track of their names so you'll know who you killed). Use Paralyze Monster on the level 120, 125 and 130 monsters and toggle it for easy kills.


Ancient Lava Furnace
Now take all 3 crystal pieces to the Ancient Lava Furnace in the north-east. Place them all in one at a time then you get A red crystal. Use the crystal on the brown rocks between the level 125s and level 130s to make it a glowing red crystal. Use the Crystal on the Cavernous Opening to the south. You might attacked by Lesser Demons, just keep running west.
Attempt to "Move Rocks" by the north-west of the creek. Echned Zekin the ghost will appear, select the following chat options: "Who's asking? Do I know you? What can I do about that? I'll do what I must to get the water. Ok, I'll do it." You'll now have a Dark Dagger.
It should be noted that you can get a second ![]() Dark Dagger to keep if you drop the first one and talk to the ghost again to get another.
Dark Dagger to keep if you drop the first one and talk to the ghost again to get another.
Backtrack all the way up the agility obstacles to the blue wizards hat.
Required: Armour, Blessed Golden Bowl with Pure Water, Book of Binding, Machette, Radimus Scrolls, Weapon
Suggested: Axe, Holy Water Vial, Magic spells, Silverlight, Super combat set
Second Battle
Now you have two options; option 1 covers the easier but more lengthy one. The shorter and potentially more dangerous option 2 is covered below it.
Option 1: Fighting the Demon with Holy Force Spell
Leave the hat alone. Climb up the rope. Continue backtracking to Ungadulu. Go withdraw your Magical Fire Pass if you don't have it to pass by the flamewalls. Use the Dark Dagger on Ungadulu and he will give you a Holy Force Spell. Go through the tunnels again and back through the door (use another Orb spell on it). Search the plank above the hole and it will re-attach your old rope. Go down it.
Make your way back to Echned Zekin's rock. Move the rock and he will comment that your sense of purpose is different. Stop talking to him by clicking away when chat options appear, and he will remain there. Make sure you're at full health, you're about to fight the level 172 demon Nezikchened again. Now it's time to use a Strength Potion, Attack Potion, Defense Potion or super set if you have one. When you're ready, use your Holy Force Spell on the ghost, or click its "Cast" option. He will transform to the demon, drain your prayer to about 25 depending on your level, and attack. Just toggle Paralyze Monster on/off for the fight, or use magic on him. Make sure not to run.
Warning: if you do try to run at low health, he will call you a coward and get a couple extra hits on you before you actually leave battle, making your death a very likely outcome. If you are dangerously low on health, it's best to teleport to escape instead.
Once defeated (this fight should be easier than the first), move the rock again. Use your Blessed Golden Bowl on the water spot beneath the rock.
Option 2: The Shorter (But More Difficult) Way
You need to take the following steps to reach the new source of pure water if you don't have the Magical Fire Pass necessary to reach Ungadulu and show him the Dark Dagger. Note: you may talk to Ungadulu, or escape from the flames if you are trapped there as a result of not being given the Magical Fire Pass by investigating the flames. You just can't give him the dagger.
- Return to the stairs and Viyeldi's hat.
- Attempt to take the hat and attack Viyeldi with the Dark Dagger given to you.
- Return to the rock. Make sure you are prepared for another fight with the demon.
- Attempt to move the rock when you are ready (i.e. you have taken a super potion set).
- Echned Zekin will reveal his true form and attack you. Beware, he will drain ALL your prayer points and will be at full power. Silverlight, super sets, and heavy armour is highly recommended. If you can, bring a friend to spot you and save your things if you die. Make sure they don't try to assist with magic or range, as the demon will disappear if they try to help.
- If this version of demon is too hard for you, you can return to Ungadulu after having given the dagger back to Echned Zekin. Talk to him through the flames by clicking "Investigate", announce you killed Viyeldi, and ask what you can do about it. He'll give you the Holy Force spell for free, and you can use it just like in method 1.
- Once you have defeated the demon, you can move the rock and collect the pure water with your Golden bowl. If you don't have your bowl, moving the rock will allow you to get water from the spring on the surface again using the reeds.
Required: Blessed Golden Bowl with Pure Water, Germinated Yommi tree seeds, Machette, Radimus Scrolls, Rune axe
Suggested: None
Totem

Totem pole
Go back up to Ungadulu and tell him the good news. Make sure to ask "What do I do now ?". Now make sure you bank. Withdraw your rune axe and restore all of your prayer and hits.
Find some fertile earth and use your Germinated Yommi tree seeds on it. It may fail so just go back to Ungadulu for more seeds or if you're not quick enough watering it, it may die. Now use your bowl of pure water on the Yommi Tree to make it grow big, then use your Rune axe on it to chop it down, once more to cut the branches of once it falls over, and a last time to make it into a totem pole. Now pick it up off the ground and you will lose around 7 strength levels. You can restore them with a potion or by waiting.
Required: Armour, Bull Roarer, Machette, Radimus Scrolls, Totem Pole, Weapon
Suggested: Axe, Magic spells, Silverlight, Super combat set
Third battle
Now find a Totem Pole in the south of the jungle. Prepare yourself by potting up. When you're ready, use the totem pole you have in your inventory on the totem pole standing on the ground.
If you gave the dagger to Ungadulu, you will now get attacked by Nezikchened again. This time, he will NOT drain your prayer, so just use Paralyze Monster the whole way through.

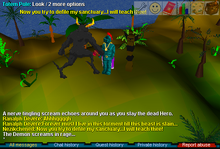
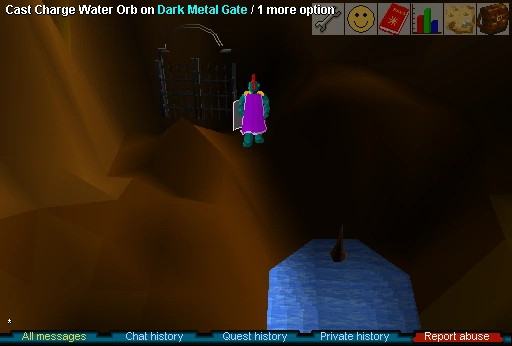
Fighting Nezikchened for the last time
If you killed Viyeldi with the dark dagger, you must fight the three spirits first before you can kill the demon. Fortunately, you only have to kill each one once, meaning if you need to run after killing one, they will not appear again. Do this if your prayer or health is running low to recharge before continuing your fight with the next combatant. When you fight Nezikchened, he will drain your prayer to around 12 from full, but with proper gear and preparation, this should still be easier than the other two fights.
After you kill the demon for the third and final time, use your Totem Pole on the other pole, and swing your bull roarer to say good bye to Gujuo. You'll get a Gilded Totem Pole from him.
Required: Gilded Totem Pole, Radimus Scrolls
Suggested: Teleport to Ardougne
Finishing Up

Completing the quest
Now, return to the Legends Guild. Use the Gilded Totem Pole on Sir Radimus Erkle. Now enter the doors up north and talk to Sir Radimus Erkle to get experience in 4 skills of choice. Most players choose Herblaw, as it will get you up a few levels from 45. You can now wield a Dragon Square Shield and wear a Legends Cape which can be purchased in the guild.
| ||||||||||||||